Products
ProductsSolutionsApplications
Resources
Introduction
L2TP (Layer 2 Tunneling Protocol) by itself does not provide encryption, which means the data transmitted through an L2TP tunnel is not protected from interception or tampering. To address this security issue, L2TP is often combined with IPsec (Internet Protocol Security). IPsec provides robust encryption and authentication, ensuring that the data transmitted through the L2TP tunnel is secure.
This article provides an example of how to configure an L2TP over IPsec server on D-Link M2M routers. It demonstrates how to set up L2TP over IPsec services for clients who want to establish a secure connection from other D-Link M2M routers, or devices such as PCs, iOS, and Android platforms, and then successfully access the internal network.
Please note that this example is based on specific prerequisites and topology. D-Link does not guarantee compatibility with all platforms or clients.
Prerequisites
1. L2TP over IPsec Server: This feature is applicable to the following models:
- DWM-530-T, DWM-550-G, DOM-550-TSO, DOM-550-GSO, DTM-550-G
- The IP address of the WAN interface is a public IP address.
2. L2TP over IPsec client:
- At least one end device (a D-Link M2M device mentioned above, PC, or laptop)
Please note that this prerequisite assumes both the server and client sites are Internet accessible.
Topology

This topology diagram shows an L2TP over IPsec scenario. A D-Link M2M device on the left side with a public IP address acts as the L2TP/IPsec server, while another D-Link M2M device, NB, and phone on the right side act as L2TP/IPsec clients. The L2TP/IPsec clients will obtain a virtual IP address after the L2TP connection is established and will be able to reach PC A. The packets in the L2TP tunnel are encapsulated and encrypted by IPsec between the server and clients.
Before starting L2TP/IPsec configuration, please make sure the basic network settings of the D-Link M2M device are configured properly.
Server Configuration
1. Before the L2TP over IPsec configuration, please check the WAN interface status and make sure the M2M router/gateway WAN interface has already obtained a public IP address.
Go to Status > Basic Network > WAN & Uplink tab

2. Enable L2TP over IPsec server:
Go to Security > VPN > L2TP tab
Select Server in Client/Server

3. The L2TP Server Configuration will appear.

| Item | Description |
|---|---|
| L2TP Server | Click the Enable box to activate L2TP server |
| Interface | Select the available WAN interface on which L2TP tunnel is to be established |
| L2TP over IPsec | Click the Enable box to enable L2TP over IPsec and need to fill in the Pre-shared Key |
| Server Virtual IP | Set this L2TP server local virtual IP address |
| IP Pool Starting Address | Set the starting IP address of Server Virtual IP subnet to be assigned to L2TP client |
| IP Pool Ending Address | Set the ending IP address of Server Virtual IP subnet to be assigned to L2TP client |
| Authentication Protocol | Select PAP, CHAP, MS-CHAP and MS-CHAP v2 Authentication Protocols |
| MPPE Encryption | Leave the Enable box unchecked to disable MPPE |
| Service Port | Leave the Service Port 1701 default setting |
| Save | Click the Save button to save the configuration |
4. Create user account for L2TP/IPsec clients
You can create and add accounts for remote clients to establish L2TP/IPsec VPN connection to the L2TP/IPsec server.
Please refer to device specification for maximum client support.

| Item | Description |
|---|---|
| User Account List |
Click the Add button to add a user account. Enter the User Name and Password for client authentication Check the enable box to enable the user. Click the Save button to save a new user account |
Client Configuration
A. D-Link M2M device acts as an L2TP/IPsec client
1. Enable L2TP over IPsec client: Go to Security > VPN > L2TP tab
Select Client in Client/Server


3. Click the Add button to create L2TP client configuration.

Please refer to device specification for maximum tunnel support in client mode.
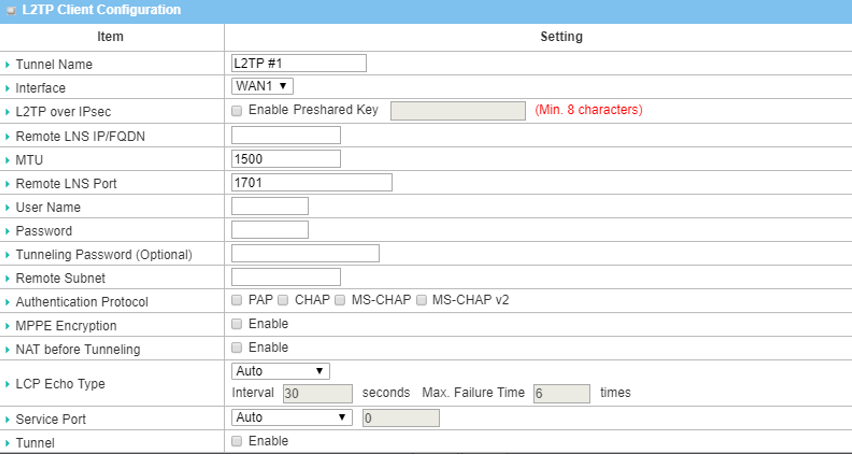
| Item | Description |
|---|---|
| Tunnel Name | Enter a tunnel name |
| Interface | Select the available WAN interface on which L2TP tunnel is to be established |
| L2TP over IPsec | Click the Enable box to enable L2TP over IPsec and fill in the Pre-shared Key |
| Remote LNS IP/FQDN | Enter the public IP address or the FQDN of the L2TP server |
| MTU | Leave the MTU 1500 default setting |
| Remote LNS Port | Leave the Remote LNS Port 1701 default setting |
| User Name | Enter the User Name for this L2TP tunnel to be authenticated |
| Password | Enter the Password for this L2TP tunnel to be authenticated |
| Remote Subnet | Enter the remote subnet for this L2TP tunnel to reach the L2TP server. Note: 0.0.0.0 is full tunnel |
| Authentication Protocol | Select PAP, CHAP, MS-CHAP and MS-CHAP v2 Authentication Protocols |
| MPPE Encryption | Leave the Enable box unchecked to disable MPPE. |
| NAT before Tunneling | Leave the Enable box unchecked to disable NAT before Tunneling |
| LCP Echo Type | Select Disable the LCP Echo |
| Service Port | Leave the Service Port 1701 default setting |
| Tunnel | Check the Enable box to enable this L2TP tunnel |
| Save | Click the Save button to save the settings |
B. Windows 10 NB acts as an L2TP/IPsec client
1. Go to Windows Start > Setting > select Network & Internet
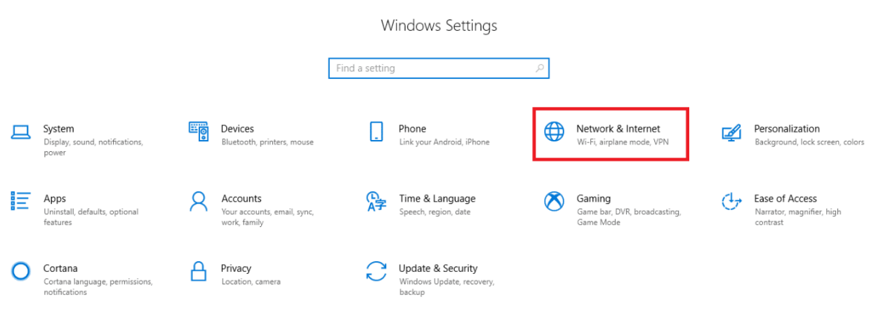
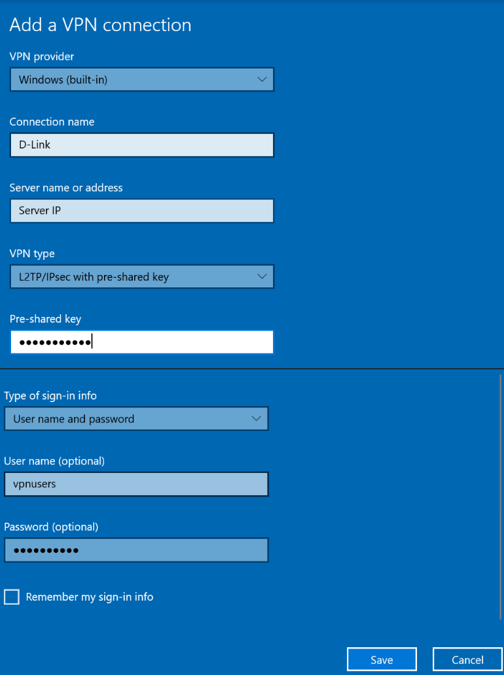
2. Select VPN in the left panel and click Add a VPN connection.
| Item | Description |
|---|---|
|
VPN Provider |
Select the “Windows (built-in)” option |
|
Connection Name |
Enter a custom name |
|
Server Name or Address |
Enter the public IP of the L2TP/IPsec server |
|
VPN Type |
Select “L2TP/IPsec with pre-shared key” |
|
Pre-shared Key |
Enter Pre-shared key |
|
Type of Sign-in Info |
Select “User name and password” |
|
User Name |
Enter the User Name for this L2TP tunnel to be authenticated |
|
Password |
Enter the Password for this L2TP tunnel to be authenticated |
|
Save |
Click the Save button to save the settings |
Test Result
Please configure the device according to the above environment, then validate to ensure everything works as expected.
1. From L2TP/IPsec Server device web UI Go to Status > VPN Status
This table displays a list of authenticated usernames and successfully established tunnels in the L2TP Server Status if there are clients connected to the L2TP/IPsec server.

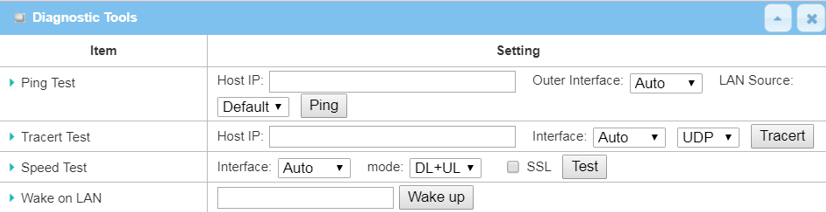
2. From the L2TP/IPsec Server device web UI Go to Diagnostic Tools.
Enter a Remote Virtual IP address and click the “Ping” button to check if the traffic can pass through successfully.
3. From the L2TP/IPsec client of Window NB, go to Search > Enter cmd to open the Windows CLI. To use a ping command, type ping <ip_address> under L2TP/IPsec server and press Enter. There will be an ICMP reply from the <ip_address> (Please make sure the client is reachable.)