Products
ProductsSolutionsApplications
Resources
Introduction
OpenVPN is a widely recognized application that implements virtual private network (VPN) techniques to create secure point-to-point or site-to-site connections. These connections can be configured in routed or bridged modes and are suitable for remote access facilities. OpenVPN uses a custom security protocol that leverages SSL/TLS for key exchange, enabling it to traverse network address translators (NATs) and firewalls.
OpenVPN tunneling is a client-server based technology. The OpenVPN server must have a public IP address or FQDN (Fully Qualified Domain Name) and maintain a list of clients. The OpenVPN client can be a mobile user or a mobile site with either a public or private IP address, requesting an OpenVPN tunnel connection.
There are two OpenVPN connection scenarios, a layer 3 based IP tunnel (TUN) and a layer 2 based Ethernet bridge (TAP) scenarios.
1. “TUN” mode is referred to routing mode and operates with layer 3 packets. In routing mode, the OpenVPN server creates a "TUN" interface with its own IP address pool which is different from the local LAN. Remote hosts that dial-in will get an IP address inside the virtual network and will have access only to the server where OpenVPN resides.
2. "TAP" mode, also known as bridge mode and operates with layr 2 packets. In bridge mode, the VPN client is given an IP address on the same subnet as the LAN resided under the OpenVPN server. This allows the VPN client to directly access the resources on the LAN.
This article provides an example of how to configure OpenVPN server and client functionality on D-Link M2M routers.
Please note that this example is based on specific prerequisites and topology. D-Link does not guarantee compatibility with all third-party platforms or clients.
Prerequisites
1. 2 x M2M devices: OpenVPN is applicable to the following models:
- OpenVPN Server/Client: DWM-313, DWM-530-T, DWM-550-G, DOM-550-TSO, DOM-550-GSO, DTM-550-G, DTM-570-GS
- OpenVPN Client: DWM-311, DWM-311-TP, DWM-311-G, DWM-311-GP, DWM-314-T, DWM-314-TP, DWM-314-G, DWM-314-GP, DOM-311-TSO
2. The WAN interface of the OpenVPN server must have a public IP address.
Please note that this prerequisite assumes both sites are Internet accessible.
Topology
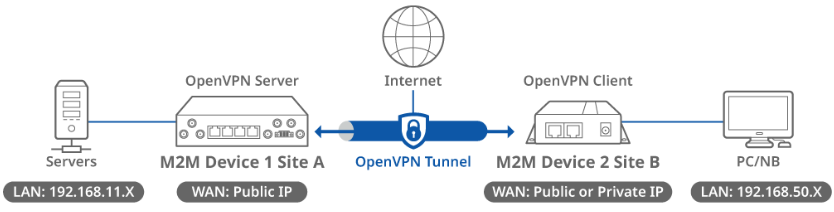
This topology diagram illustrates an OpenVPN client-to-site scenario. A D-Link M2M device at Site A acts as an OpenVPN server and has a public IP address on its WAN interface, while another D-Link M2M device at Site B acts as an OpenVPN client and has either a public or private IP address on its WAN interface. Once an OpenVPN tunnel is established between the two sites, the devices in the LAN subnet (192.168.50.x) at Site B can reach the LAN subnet (192.168.11.x) at Site A.
Before starting OpenVPN configuration, please make sure the basic network settings of the D-Link M2M device is configured properly.
Device 1 OpenVPN Server Configuration (Site A)
1. Before OpenVPN server configuration, please check WAN interface status and make sure the M2M router/gateway WAN interface has already obtained a public IP address.
Go to Status > Basic Network > WAN & Uplink tab

In this example, the OpenVPN server and client will use the TLS authentication method. It requires multiple certificates and keys to verify the identity and subsequently establish an encrypted connection.
2. Generating TLS certificates/keys
2-1 Go to Object Definition > Certificate > Configuration tab
Click the Generate button to generate the Root CA

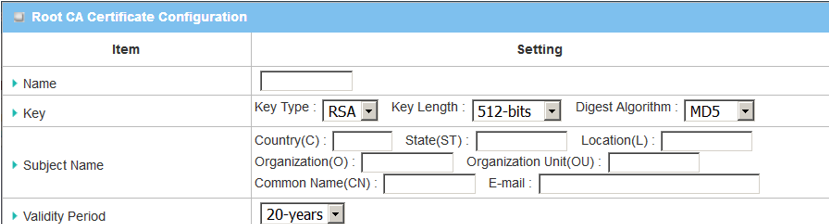
The Root CA Certificate Configuration will appear.
| Item | Description |
|---|---|
| Name | Enter the Root CA Certificate name |
| Key |
Key Type: Select RSA Key Length: Select 512-bits Digest Algorithm: Select MD5 |
| Subject Name |
Fill in the certificate information in the columns Country (C) State (ST) Location (L) Organization (O) Organization Unit (OU) Common Name (CN) |
| Validity Period | Select 3-years |
2-1 Go to Object Definition > Certificate > My Certificate tab
Click the Add button to generate the Local Certificate List

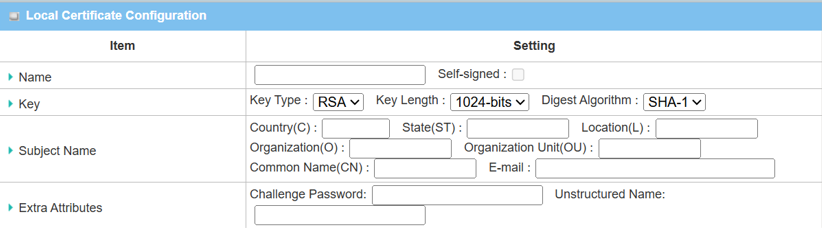
The Local Certificate Configuration will appear.
| Item | Description |
|---|---|
| Name |
Enter the local certificate name Check Self-signed box |
| Key |
Key Type: Select RSA Key Length: Select 1024-bits Digest Algorithm: Select SHA-1 |
| Subject Name |
Fill in the certificate information in the columns Country (C) State (ST) Location (L) Organization (O) Organization Unit (OU) Common Name (CN) |
| Extra Attributes | Leave empty |
| Save | Click the Save button to save the configuration |
3. Download Root CA, Local Certificate and Local Certificate Key for the OpenVPN client of the M2M device in site B in advance.
3-1 Go to Object Definition > Certificate > Configuration tab
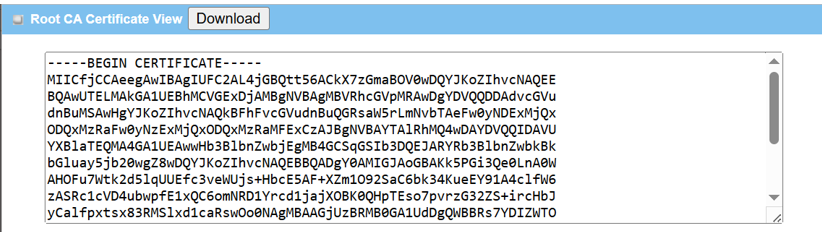
Click the View button to show Root CA certificate

Click the Download button to download Root CA certificate
3-2 Go to Object Definition > Certificate > My Certificate tab
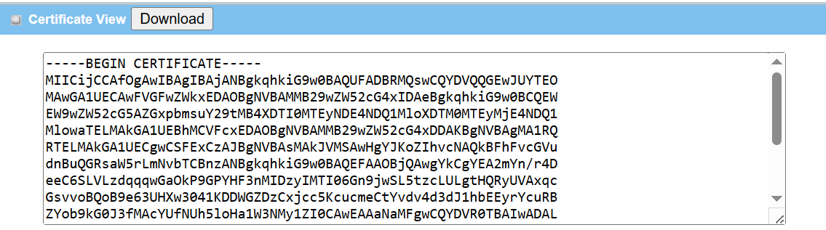
Click the Certificate View button to show the local certificate

Click the Download button to download the local certificate
3-3 Go to Object Definition > Certificate > My Certificate tab
Click the Certificate Key View button to show the local certificate key

Click the Download button to download the local certificate

4. After the SSL/TLS certification is ready, start configuring the OpenVPN server
Go to Security > VPN > OpenVPN tab

| Item | Description |
|---|---|
| OpenVPN | Check the Enable box to activate the OpenVPN function |
| Server / Client | Select Server to enable OpenVPN server |
| OpenVPN Configuration File | Check the Enable box to activate the configuration export for OpenVPN client |
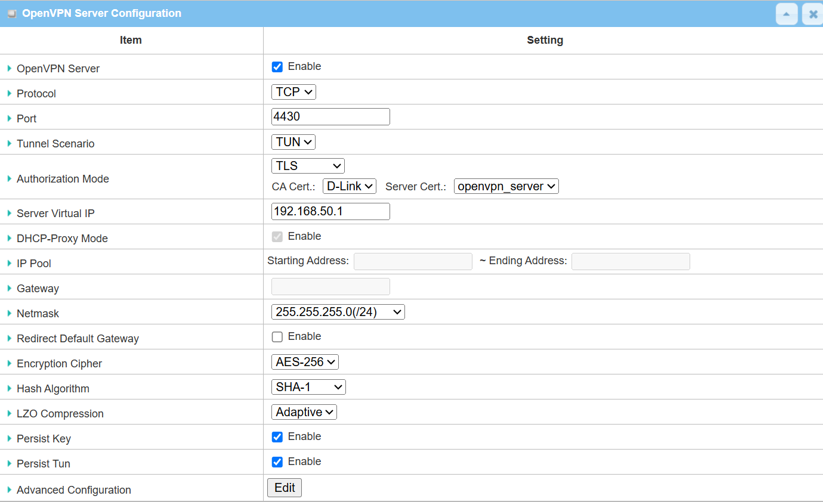
5. OpenVPN Server Configuration
| Item | Description |
|---|---|
| OpenVPN Server | Click the Enable to activate OpenVPN Server |
| Protocol | Select TCP protocol from the drop-down list |
| Port | Leave the default setting Port 4430 |
| Tunnel Scenario | Select TUN from the drop-down menu |
| Authorization Mode |
Select TLS from the drop-down list CA Cert: Select Root CA certificate from drop-down menu Server Cert: Select Local Server certificate from drop-down menu |
| Server Virtual IP | Specify IP address range for OpenVPN client |
| Netmask | Specify the Netmask 255.255.255.0(/24) |
| Redirect Default Gateway | Uncheck the Enable box to activate split tunnel for OpenVPN client |
| Encryption Cipher | Select AES-256 from the drop-down list |
| Hash Algorithm | Select SHA-1 from the drop-down list |
| LZO Compression | Select No from the drop-down list |
| Persist Key | Check the Enable box to activate the Persist Key function |
| Persist Tun | Check the Enable box to activate the Persist Tun function |
| Save | Click Save to save the settings |
6. Download .opvn client configuration

| Item | Description |
|---|---|
| OpenVPN Configuration File | Click the Export button to download the client.opvn file |
Device 2 OpenVPN Client Configuration (Site B)
Before configuring the OpenVPN client, prepare the certificate or the client.opvn file downloaded from device A.
1. Using the client.opvn file to configure the OpenVPN client
Go to Security > VPN > OpenVPN tab

| Item | Description |
|---|---|
| OpenVPN | Check the Enable box to activate the OpenVPN function |
| Server / Client | Select Client to enable OpenVPN client |
| OpenVPN Configuration File | Click the Enable box to activate the configuration upgrade for OpenVPN client |
| Save | Click Save to activate the Upgrade button clickable |
1.1 Click the Upgrade button and upload the client.opvn file

2. Using the SSL/TLS certification to configure OpenVPN client
Go to Security > VPN > OpenVPN tab
| Item | Description |
|---|---|
| OpenVPN Server | Check the Enable box to activate the OpenVPN function |
| Server / Client | Select Client to enable OpenVPN client |
| Add | Click the Add button to activate OpenVPN client setting |
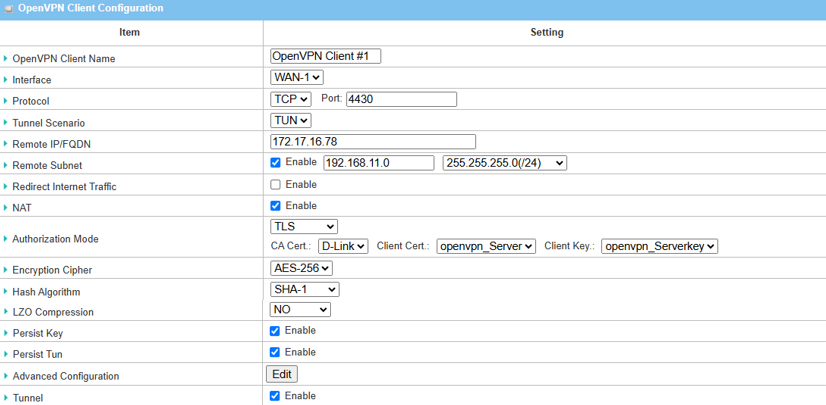
2.1 OpenVPN Client Configuration
| Item | Description |
|---|---|
| OpenVPN Client Name | Enter Name for the OpenVPN client |
| Interface | Select the WAN interface used by the OpenVPN client |
| Protocol | Select TCP protocol from the drop-down list |
| Port | Leave the default setting Port 4430 |
| Tunnel Scenario | Select TUN from the drop-down menu |
| Remote IP/FQDN | Specify IP address or FQDN for OpenVPN Server |
| Remote Subnet | Check the Enable box and specify Remote Subnet for remote access |
| Redirect Internet Traffic | Uncheck the Enable box to activate split tunnel for the OpenVPN client |
| NAT | Check the Enable box to activate NAT function |
| Authorization Mode |
Select TLS from the drop-down list CA Cert: Select Root CA certificate from drop-down menu Client Cert: Select Client certificate from drop-down menu Client Key: Select Client Key from drop-down menu |
| Encryption Cipher | Select AES-256 from the drop-down list |
| Hash Algorithm | Select SHA-1 from the drop-down list |
| LZO Compression | Select No from the drop-down list |
| Persist Key | Check the Enable box to activate the Persist Key function |
| Persist Tun | Check the Enable box to activate the Persist Tun function |
| Tunnel | Click the Enable box to activate this OpenVPN tunnel |
| Save | Click Save to save the settings |
Test Result
Please configure the device according to the above environment, then validate to ensure everything works as expected.
From Device 1
1. Go to Status > Security > VPN tab
The OpenVPN Server Status will display the status of all connected OpenVPN tunnels.

From Device 2
2. Go to Status > Security > VPN tab
The OpenVPN Client Status will display the status of client connected to the OpenVPN server.
