Products
ProductsSolutionsApplications
Resources
Introduction
WireGuard is a modern, high-performance VPN (Virtual Private Network) protocol designed to be simple, fast, and secure. Unlike traditional VPN protocols like OpenVPN or IPSec, WireGuard is free and built with a minimal open-source codebase. It uses state-of-the-art cryptography and operates at the kernel level, which allows for faster speeds and lower latency. WireGuard is ideal for both personal and enterprise use, offering seamless connectivity across platforms with strong security and ease of configuration.
This article provides an example of how to configure WireGuard VPN functionality on D-Link M2M routers.
Please note that this example is based on specific prerequisites and topology. D-Link does not guarantee compatibility with all third party platforms or clients.
Prerequisites
1. 2 x M2M devices: The WireGuard feature is applicable to the following models:
- DWM-314-G, DWM-311-TP, DWM-311-GP, DWM-314-GP, DWM-550-G, DOM-550-GSO, DTM-550-G
- The WAN access of WireGuard Server devices must have a global IP.
Please note that this prerequisite assumes both sites are internet accessible.
Topology
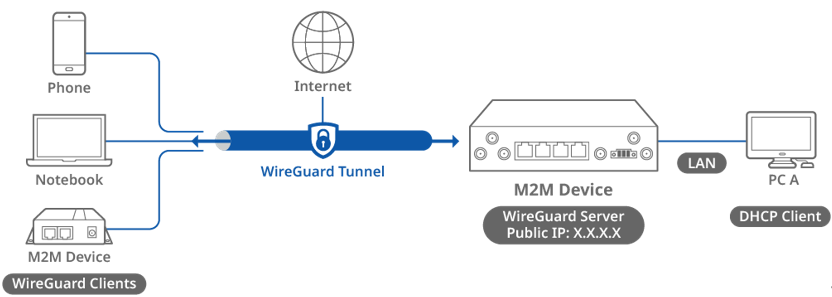
This topology diagram illustrates a WireGuard VPN scenario. A D-Link M2M device on the left side with a public IP address acts as the WireGuard server, while another D-Link M2M device, a notebook and phone on the right side act as the WireGuard clients. The WireGuard clients will obtain a virtual IP address after the WireGuard connection is established and will be able to reach PC A.
Before starting WireGuard configuration, please make sure the basic network settings of the D-Link M2M device are configured properly.
WireGuard Server Configuration
1. Before WireGuard server configuration, please check the WAN interface status and make sure the M2M router/gateway WAN interface has already obtained a public IP address.
Go to Status > Basic Network > WAN & Uplink tab

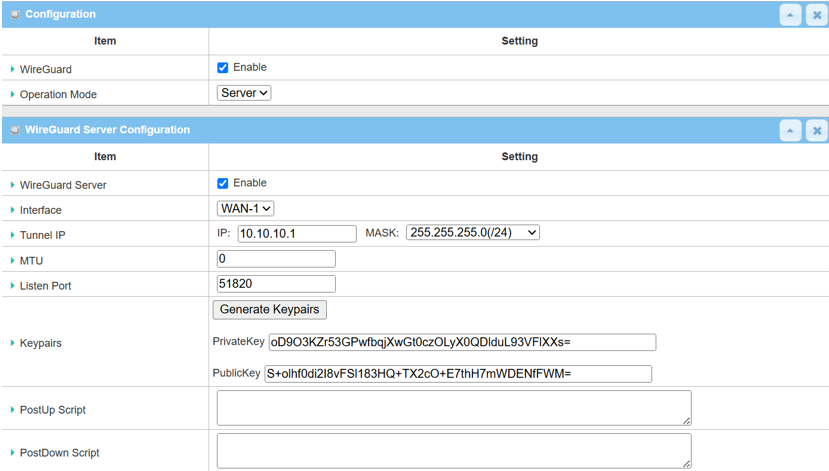
2. Go to Security > VPN > WireGuard tab
| Item | Description |
|---|---|
|
WireGuard |
Check the Enable box to activate WireGuard |
|
Server/Client |
Select Server from drop-down list |
|
WireGuard Server |
Check the Enable box to activate the WireGuard server |
|
Interface |
Select the WAN-1 on which the WireGuard tunnel is to be established |
|
Tunnel IP |
Specify the IP address (10.10.10.1) for the WireGuard client Select the Subnet Mask from the drop-down list |
|
Remote Subnet |
Specify the Remote subnet IP address: 192.168.20.0 |
|
MTU |
Specify the MTU 1400 |
|
Listen Port |
Specify 51820 port for WireGuard service |
|
Keypairs |
Click Generate Keypairs to generate Private Key and Public Key |
|
Save |
Click the Save button to save settings |
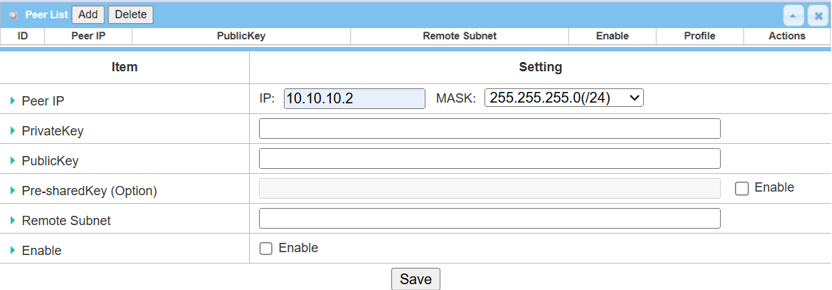
3. Click the Add button of the Peer List to create Peer Configuration for WireGuard Clients.
| Item | Description |
|---|---|
|
Peer IP |
Specify the IP address for the WireGuard client |
|
Private Key |
System will auto-generate the Private Key |
|
Public Key |
System will auto-generate the Public Key |
|
Pre-Shared Key (Option) |
Check the Enable box if a Pre-Shared Key is required |
|
Remote Subnet |
Specify the Remote subnet (option), including the Peer IP Range |
|
Enable |
Check the Enable box to enable this Peer setting |
|
Save |
Click the Save button to save settings |
WireGuard Client Configuration for D-Link M2M Device
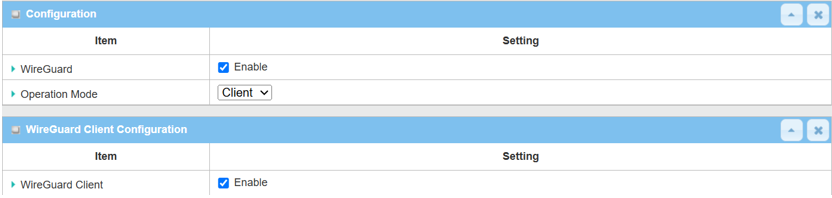
1. Go to Security > VPN > WireGuard tab
| Item | Description |
|---|---|
|
WireGuard |
Check the Enable box to activate WireGuard |
|
Server/Client |
Select Client from drop-down list |
|
WireGuard Client |
Check the Enable box to activate WireGuard Client |
|
Save |
Click the Save button to save the settings |
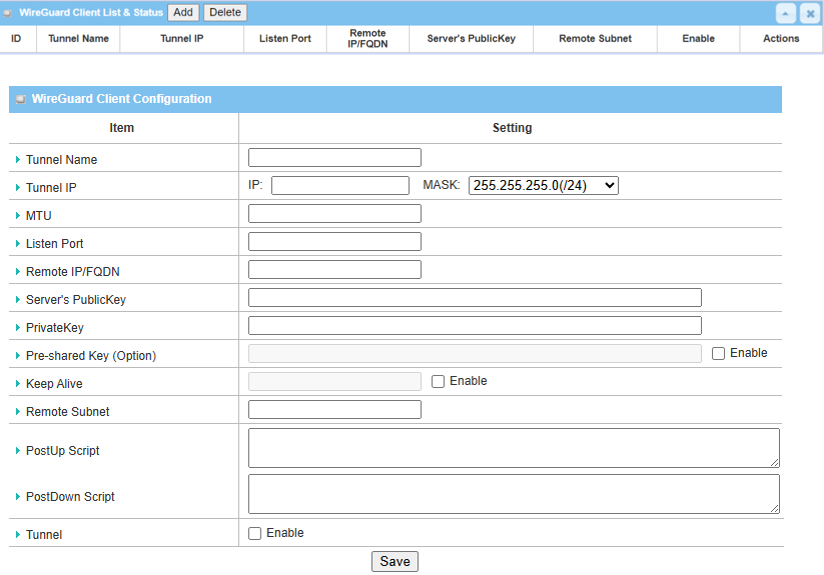
2. Click the Add button of WireGuard Client & Status to create WireGuard Client Configuration.
| Item | Description |
|---|---|
|
Tunnel Name |
Enter the WireGuard Client name |
|
Tunnel IP |
Specify the IP address (10.10.10.2) for the WireGuard Client Select the Subnet Mask from the drop-down list |
|
MTU |
Specify the MTU 1400 |
|
Listen Port |
Specify 51820 port for WireGuard service |
|
Remote IP/FQDN |
Specify public IP Address of the WireGuard server's WAN interface |
|
Server’s Public Key |
Specify Public Key of the WireGuard server |
|
Private Key |
Specify Private Key of Peer list in the WireGuard server |
|
Remote Subnet |
Specify the Remote subnet IP address (x.x.x.x/x) of the WireGuard server |
|
Tunnel |
Check the Enable box to enable this WireGuard tunnel |
|
Save |
Click the Save button to save settings |
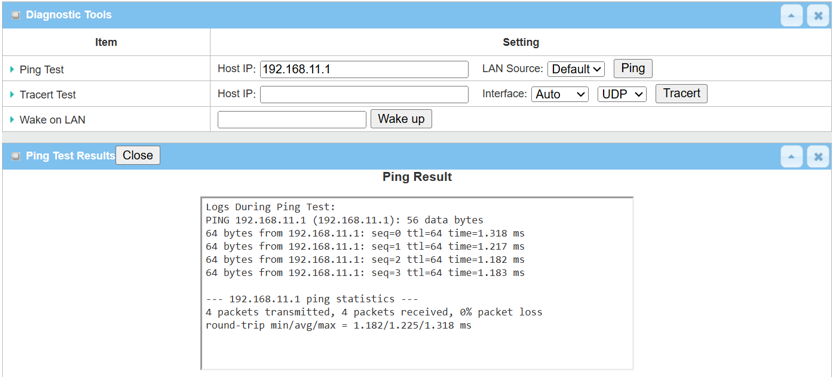
Test Result
Please configure the device according to the above environment, then validate to ensure everything works as expected.
1. From the WireGuard Server or Client device web UI
Go to Administration > Diagnostic > Diagnostic Tools
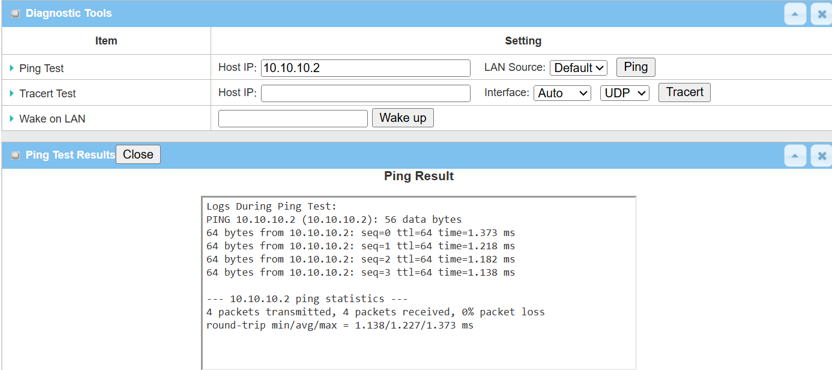
2. Enter <Remote Tunnel IP> or <Remote LAN device IP> within the remote subnet and click the Ping button to check if network traffic can pass through successfully.